

- Jun 2, 2021
- 4 min read
Updated: Jul 1, 2021
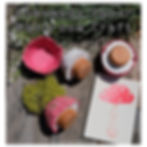
We combined several of our favourite things into one craft! First of all, toadstool mushrooms! How lovely are the sight of woodland mushrooms? They evoke fairy tales. Secondly, using beautiful flower blossoms always brightens our day. Third, creating recycled homemade paper is fun and is zero waste. Fourth, combining upcycled materials (a wooden toy block and paper) to create something new and exciting. The fifth favourite is experimenting with plaster! Plus, this craft was designed by us, so we are certain it is unique!

These adorable mushrooms that can be used as decoration in indoor fairy gardens, along backyard lighting during summer parties and as little toys in play kitchens or pretend play!! A great craft to create while learning about mushrooms.
They are fun to make and the craft itself will teach kids many crafting skills, like how to make homemade paper, or how to mix and pour plaster from powder. You will be experimenting with different materials and combining them in a unique way! This craft offers a fun experimental process but the finished craft mushroom is worth holding onto.
By using recycled and upcycled materials we minimize the need to buy the supplies. We hope you’ll find most of the supplies laying about at home. You will need to buy plaster of Paris if you don’t already have that, you won’t need much.

Materials:
Pieces of RED paper, recycled cardboard and/ or construction paper
A cylinder piece of wood, like from a kid’s toy block collection.
Plaster of Paris, plus a spoon and a recycled container to mix it.
Water
A Blender
Paper making frame and screens
A small round cup or round container (recycled fruit cup)
White flowers or white dried flower petals

Instructions:
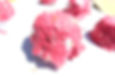
1. Find a small round cup to act as a mold. A coffee cup, or a plastic recycled fruit cup would work. We used Pyrex cups.
2. Mix your plaster of Paris (adult only, the powder isn’t good for children to inhale accidentally) in a throw away container, like a recycled plastic or glass container, according to the directions on the box, or mix the water until you get the desired thickness.
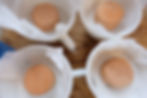
3. Line your mold cup with parchment or wax paper and pour your plaster into the small cup, you judge how much to fill it, we filled ours about half way to the top.
4. Then carefully place your wooden cylinder block (or a cut in half toilet paper roll), into the very middle of the plaster to set. If it is moving around weight it down by placing a rock on the top of the wooden block piece.

5. Allow it to set for an hour, or whenever it’s ready, then remove the entire plaster mold mushroom from the cup.

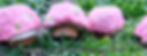
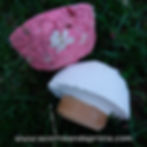
You should now have a plaster and wood mushroom! You can sand and paint the mushroom as is, or add the paper element!

Now it is time to add the homemade paper to the top, to decorate it!
Creating the homemade paper mushroom cap:
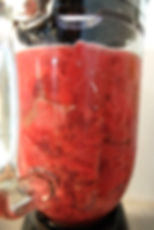
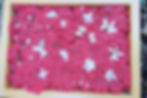
Rip up a cup or two of red paper (using recycled red paper or red cardboard, if you have it).

2. Blend the paper in a blender with two or three cups of water, blend on high until it is a pulp. Add more water if it is too thick.
3. Pour the blended pulp into you paper making frame. We do this process outside, and let the water run out onto the ground, It makes paper making easy with children.

4. Add white fresh or dried flowers to the paper while it’s in the frame.
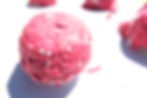
5. Press it down using a mesh screen, to take the extra water out and to stick the flowers to the pulp.

6. turn it upside down to release it onto the frame, press down one more time with a second screen, to continue flattening it.
7. lift it up with the frame, with the flowers facing downward, turn the paper over and onto the mushroom plaster mold while holding it with the mesh frame, then take the frame off.
- during this process don't lift the paper on its own, use the mesh frame, otherwise it will rip
8. Press it firmly using the mesh (or gently with a finger), to make sure it’s nice and flat all over.
9. Then, cut off any excess paper so that it is closer to the plaster. It doesn’t have to be perfect yet, you can cut it while it’s dry.

10. Allow it to dry in the sun, this takes about an hour or two, so set aside an entire afternoon, depending on the temperature.
11. When the paper is dry cut off any excess and make it straight.
You should be able to remove the paper, if desired by gently twisting until it is released, this is optional! I only removed two of them for the fun of it! It might wreck the paper if you made it too thin and might be best just to leave it be. If you do remove it, you can either glue it onto the mushroom, or allow it to be removable.
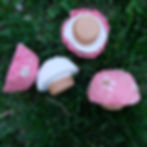
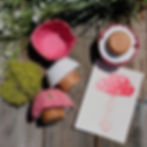
You have now created adorable paper, wood and plaster mushrooms to use in decorating, fairy gardens, home decor or for learning pretend play!

This craft idea was design by @acorns.and.aprons 2021. We hope you enjoy it! If you create this craft and wish to share your creation with us, feel free to tag us on Instagram @acorns.and.aprons. We may feature your mushroom on our story, social feed or blog post!