

- Jun 10, 2021
- 5 min read
Updated: Jul 1, 2021

We found a lonely Morel in the forest on a nature walk and decided to use it as a reference in a painting. Before the girls were born I started a very long painting of a forest floor with some morels. The painting was made using a technique of layering the paint and scraping some away with a fork to reveal the colour underneath.
It was such a fun technique and inspired many more paintings like it, so we wanted to show the girls how to do it! They had so much fun we decided to make it into a blog post so that others could give it a try! We love the way it looks but it’s also super fun for the kids to paint. Who doesn’t like painting with unusual, silly objects, like a fork!
Once the background is painted, it’s time to study a morel mushroom and paint it’s interesting curves and grooves. You could get lost in the shapes of a morel, they are fascinating and look like something from another world.
Older kids may prefer to paint the morel with a paint brush but younger ones will have fun creating the mushroom using their fingers and fingerprints! We also used a homemade stamp for the silhouette, which can be made using a potato or cardboard.

Using a natural item as a still life reference is always fun and it gives children a special connection to the natural world by examining the object and painting what they see.
Prior to painting, go on a nice nature walk and see what mushrooms you find. If you arent't certain that they are poisonous, leave them in the ground. You can also buy an edible mushroom at the store, or use a photo of a morel mushroom as reference.

The painting above was made by our two year old, so as you can see any age can make this craft. From two to 100. The other painting was created by Charlotte age 6.

Here's the wild morel that we found. Interested in finding some wild morels? They grow in one season only, the springtime! They can be found in the forest growing in both open areas and under trees. The best way to find a lot in one place is to go to a burn site from the previous summer, these are called burn morels and grow from the ashes of the fire!
We found this false Morel on our forest walk too! Do not eat these, they can make you sick.

Here is the long painting that the kids used as a reference. Notice the colours and the masking and scrapping directions.
You can add ladybugs to your painting, or anything else found in the forest! This one isn‘t finished and I plan to add more mushrooms and insects to it someday.


Materials:
A Morel musroom or any mushroom as a still life reference or a Morel Photo
Washable or acrylic paint
Paint brushes
A fork
A canvas, we used board canvas
Jar of water for the paints
Masking tape
Optional: a Morel Stamp made from cardboard or a potato, to use as a white silhouette to start off the mushroom for the painting.


Use a photo of a morel if you can’t find a real one. Print it off from the computer.

Directions:

1. Set up a white canvas with a paper under it to reduce any paint mess.

2. With a medium or large paint brush, paint the entire canvas yellow or a very light or bright green, even florescent green. Allow it to dry.


3. Place masking tape horizontally starting an inch or two from the bottom, then place another one two inches above the first one, then another one an inch above that, repeat until you teach the top.
You can make the masking tape thinner by ripping it or cutting it, or leave it as it is. Place them where you want, as long as it is horizontall placed and reaches from one side to the other.

4. With your darkest green colour paint two of the sections dark green. Paint the one at the bottom and then skip one, then paint the next one etc.
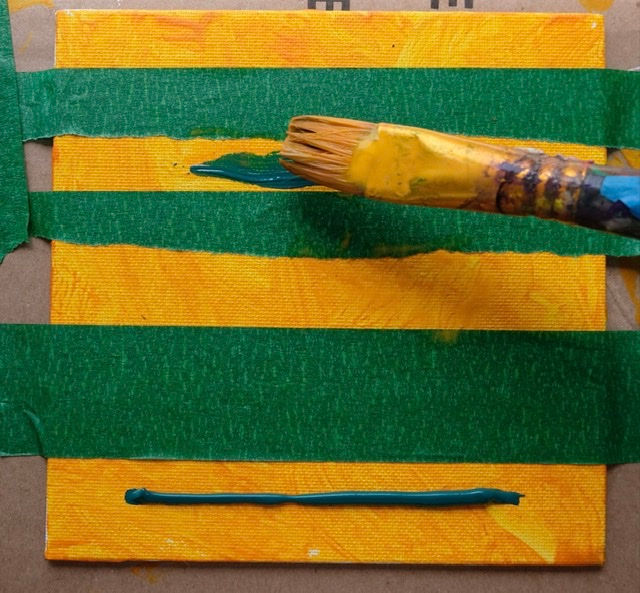
Make sure the paint is thick and don’t allow it to dry, so paint it fast & thick.
The masking tape will give you an even line so paint right over it, just don’t paint into the next section.

5. Before the paint dries, take your fork and scrap the paint downward, to create a grass-like look. You can scrap vertically or do what our two year old did and scrap wherever.

6. Continue the scrapping process to all of the dark green painted areas, so it now as the textured fork scraps. You‘ll be able to see the yellow underneath coming through.

7. Keep the masking tape on and now paint the rest of the yellow a light green, the sections you didn’t paint yet.

8. Do the same technique of painting it on and scrapping it with a fork before it dries. Scrap all of the light green sections.

9. You can now take off the masking tape.

10. You will have a bunch of yellow vertical lines left, take a different shade of yellow or green and Paint the remaining yellow areas carefully, you don’t have to paint right to the edge.

11. We painting light yellow on dark yellow, scrap the yellow with a fork . So that all of the segments now have some scrapping textures added to it.
Allow it to dry then paint a Morel!

Painting the Morel Mushroom:
To make it easier, you could make a cardboard stamp as a template, and then add cream or white coloured paint and stamp it on. This will be the underpaint for your morel.

The stamp helps the littler children, by showing them where to put the holes on the morel.

You will need to add more details and brown to the stamp but it helps to add a light silhouette first, either with a homemade cardboard stamp, a potato stamp or painting an oval white shape before painting the rest of the details.

Add the stem and all of the morel holes and any other brown colours that you see on your still-life or morel photo..
Let the child decide how they want to paint the morels, some like to use a brush, but others may prefer to finger paint it. Some of the holes were made with a brush and some with tiny fingers!
You can use fingerprints or finger smears to create the holes and it looks super cute and is an easy technique for kids.

Allow it to dry and display it somewhere nice!

We love how these turned out and couldn’t be prouder. The kids loved painting them and they were a huge success!


Use any combination of paint colours that you like! We find different shades of green, yellow and brown work best for forest floor. You cab make the top layers all green, like in the original photo, or alternating layers of green and yellow.


We hope you have fun creating this unique Forest floor Morel painting! We would love to see your creative artwork. Tag us on Instagram @acorns.and.aprons, so we can see what you have created! We also enjoy sharing other people’s work, so we may end up sharing it to our blog, or to stories or as a post!


Comments