- May 10, 2023
- 4 min read

Who doesn't love getting their hands messy with paint? Painting is a fun and creative activity that kids of all ages enjoy. One of the best crafts you can make with paint is a handprint craft, which creates a memorable keepsake that you can give as a gift or keep for yourself.
While these handprint crafts may be delicate and tear easily, they are too beautiful not to make and you will want to hang onto them for as long as possible. The best part about this craft is that it's suitable for all ages, from young children to adults. Even the little ones can participate by adding their handprint, decorating the frame, and selecting the flowers they want to include. Just be sure to supervise and assist them when needed, especially with the gluing process.
If you plan ahead, you can collect some flowers from a nature walk or your garden, and press dry them for a few days before starting the craft. We suggest picking wildflowers from vines or blossoms from trees for a unique and natural touch. And if the weather is nice, why not take your craft outside and enjoy the sunshine while you work?
This is the Perfect craft to celebrate Mother’s Day!
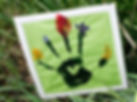
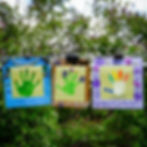
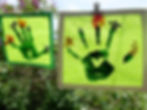
As you can tell by the photos, the tissue paper changes colours slightly depending on the sun and where it is hung up in your house!
Materials:
Tissue paper - green and blue. (or kite paper)
Green paint, washable or non-toxic acrylic
Watercolour paper or thick cardboard
White non-toxic school glue or Mod Podge
Pressed Dried Flowers - small garden flowers or wildflowers.

Steps:
To make the handprint:
1. start by laying the green tissue paper flat on a table. If you're making the handprint outside, use rocks or other objects to weigh down the paper so it doesn't move around.
2. Apply paint to the hand that you want to use for the handprint. You can let the child paint their own hand, or help them with it using a paintbrush.
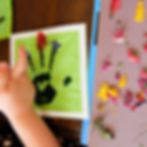
3. Press the painted hand down onto the tissue paper and hold it there for a few seconds. Then, gently lift the hand up. Since the tissue paper is delicate, it may stick to the hand a bit. To avoid tearing the paper, have a helper hold down the tissue paper as the hand is being lifted off. This will prevent any rips or tears.
MAKING THE FRAME:
Step 4: Cut out a paper or cardboard frame using scissors or an X-Acto knife into a square or rectangle shape. If you wish to create the frame by using four thin strips of paper, that works too. Use thick paper like watercolor paper to have a sturdy suncatcher.
Step 5: Before gluing your frame onto your tissue paper, you may wish to paint it or color it with markers or crayons. Our girls painted two of the frames with watercolor paints.
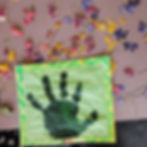
Step 6: Cut out your handprint into a square or rectangular shape, or you can also keep it on the larger sheet and cut it after you glue the frame onto the tissue paper.
Step 7: Glue your frame directly onto the tissue paper. Make sure you apply the glue to only the frame, not the tissue paper. Once the glue is applied, press it down onto the spot you wish to stick it. If you choose to use strips as a frame, glue each strip down onto the tissue paper so that it borders around your handprint, overlapping them where they join. The photo below was made using four strips of paper.
Step 8: Allow the glue to dry.
Step 9: Cut along the edge of the outer frame to removed the excess tissue paper. You will also need to cut any excess frame as well if you used a 4 strip frame instead of a fully intact one.
ADD FLOWERS TO THE FRAME:
Simply glue on flowers and lace to the frame:

APPLYING THE DRIED FLOWERS:
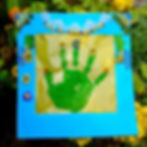
Step 10: Glue on your pressed dried flowers so that each one is glued onto the fingertips. To do this apply the glue to the flower and then press it onto the tissue paper gently. To avoid rips, do not apply the glue to the tissue paper, only to the flowers.
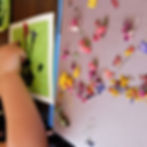
Don’t be afraid to let the flower touch the border, or even go right onto the border.
To create different colours of green tissue paper, layer your tissue paper;
1 green tissue paper for a light green.
Two tissue papers layered for the darker green.
Layer one blue and one green tissue paper for the turquoise colour. Green is on top.
Add other colours if you want a more colourful suncatcher. we went with simplistic colours so that the flowers stood out.
Place the extra layers under the handprint and glue it onto the frame when you are gluing the other pieces.
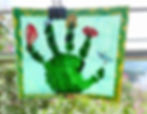

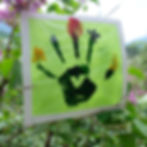
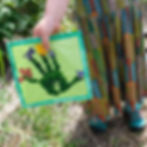
Charlotte (age 6) holding up her keepsake Flower Handprint Suncatcher.
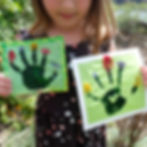
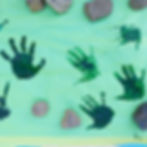
Our girls loved making this craft and also loved getting messy! The paint will easily wash off, but make sure to use a washable paint if you are concerned.
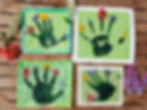
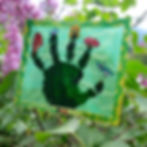
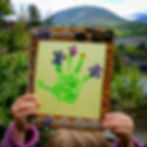
Violet (age 2) holding up her sweet handprint. She painted the frame herself as well.
We didn't take photos of some of the steps due to the messy nature of hand painting, but we hope the written steps will guide you through the process. If you have any questions don’t hesitate to email use at acornsandaprons@gmail.com. We would be happy to help with any questions.

These are adorable hung on the wall in a frame as artwork or in the window as Suncatchers. The combination of cute small hands with the flowers and delicate tissue paper is super adorable. Don’t worry if the tissue paper is a bit crinkled, that is part of the charm!
If there is a space in the middle of the palm, that sometimes happens naturally when creating a handprint, paint in a little heart! .

We hope you enjoy creating this beautiful flower handprint Suncatcher!
Feel free to tag us on Instagram @acorns.and.aprons if you create this craft, we would love to see your creations and we may feature it on our blog or social media account!