

- Mar 23, 2021
- 5 min read
Updated: Apr 3, 2023

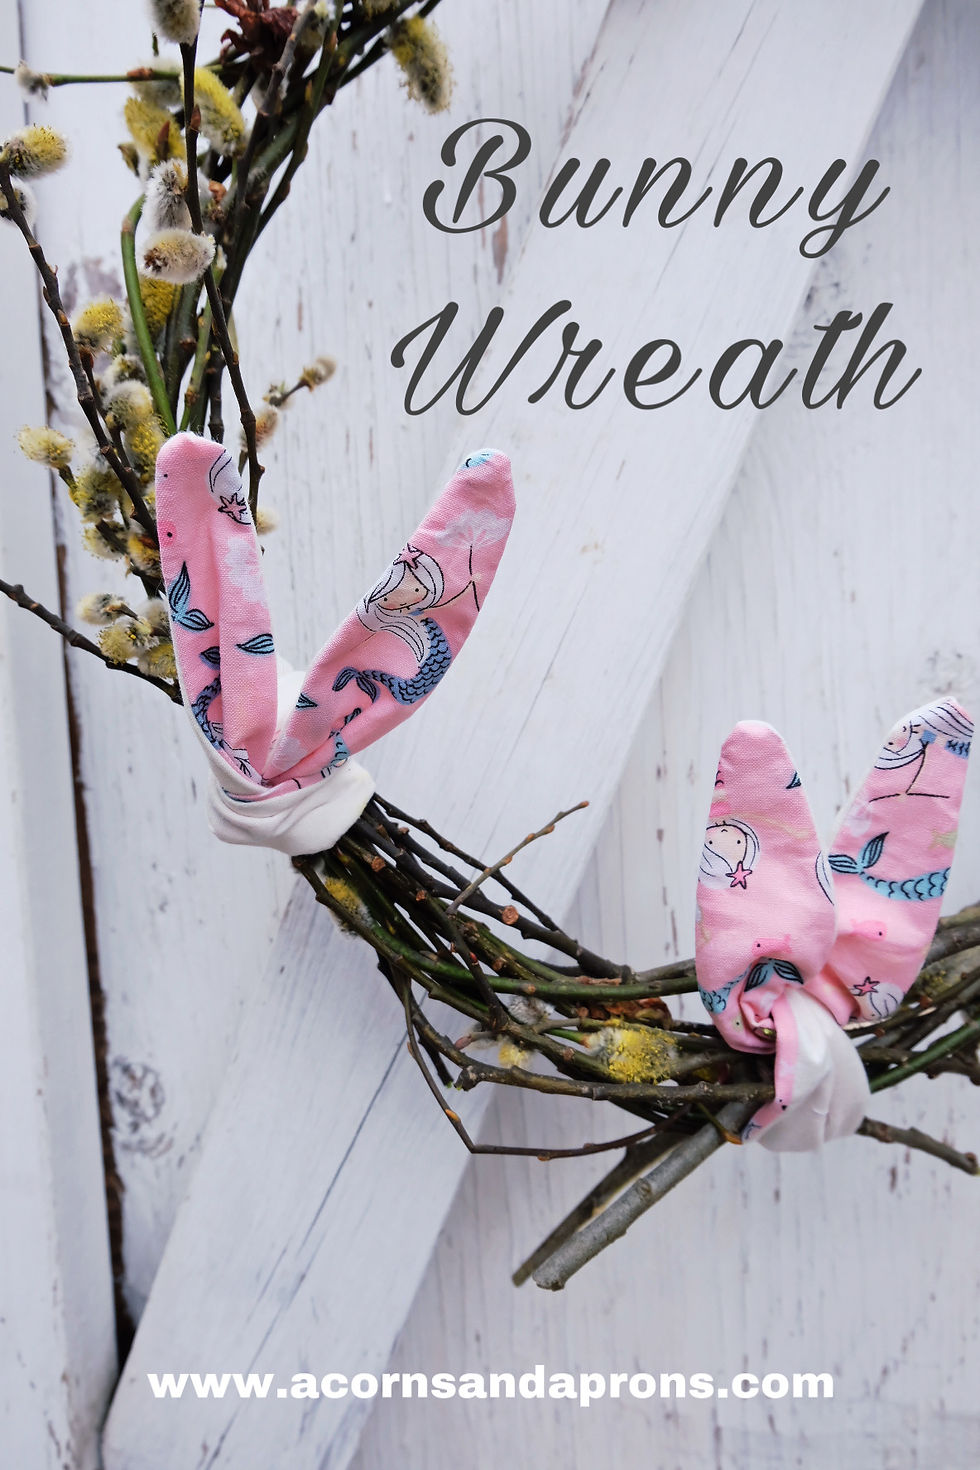
This Original Acorns and Aprons Bunny Wreath is the perfect craft for children and adults beginning to learn how to use a sewing machine. It’s also a fast and easy project for anyone that knows how to sew. It is super cute and will add some creative homemade festive flair to your front door entranceway or any room you choose to hang it in.
You can use any plant, flower or twig that you find in Nature or pick from your backyard. We have a pussy willow tree that is in full swing, so we went with a few twigs from it. The great thing about making these cute bunny ears is that you can change it up once another plant or flower sparks your interest. In this way, you can change the natural material on your bunny wreath every week with the bunny ears that you make, until Easter arrives! You can also save the bunny ears each year for a new wreath next spring!
If your child can‘t sew and you want to include them in this project, go on a nature walk and collect things for your wreath together. They can also help tie on the bunny ears to the wreath once they are made.
The creativity stops at your own imagination, and although we will show you how to make the cute bunny ears, You will be making your own unique bunny wreath by adding any natural material you can find and any colour or pattern you wish!

The bunny ears on the wreath are not only super adorable they serve as a function and helps hold the collected nature twigs, vines or flowers onto your metal wreath ring!

Materials:
A metal circular wreath ring
Pussy willow twigs or any other vines, twigs or flowers to wrap around the ring.
Chalk or washable marker
Coloured fabric - for the inner ear part
White fabric - for the outer ear
A Sewing machine
String and thread
Scissors

Directions:

Step 1:
Cut out two strips of fabric, one white and the other one any colour you choose.
Length : We made our bunny ears 18 inches long, 19 or 20 inches would work too. We didn’t want it too long or too short, these looked perfect!
Width: 2 -3/4“ wide worked best. Go with what you would like, 2-3 inches would work well.
Save time & Iron Later: We didn’t iron our fabric yet and chose to do that near the end, it gets quite wrinkled from turned it inside out. You can certainly iron it before you start but you’ll need to do it again, so we waited,

Step 2:
Layer the fabric pieces on top of each other with the good side facing inward.

Step: 3
Using chalk or washable marker draw a rounded, pointed bunny ear on both ends of the fabric strip, starting about 5 inches from the end. This is what you will follow when you are sewing The pieces together.

Step 4:
Sew: Now it is time to sew your two pieces of fabric together. You can pin them together if that helps you, but I didn’t need to because they stayed in place.
Start to sew on the edge in the middle of the strip, so that you will end there and leave a little opening ( If you See the below photo, we started at the middle folded line). The opening is how you turn your sewing right side out, so it’s important to keep an opening.
Sew along the very edge like in the pictures and when you get to your bunny ear drawing on both ends, follow your drawn line when you aren’t following the fabric edge line.

Make sure to stop before you reach the first sewing stitch. Leave about a 1 inch space, like the photo below.
Remember to backstitch when you start and stop your stitch, to secure it.

Step 5:
Cut the extra fabric around the bunny ear edges, to remove any bulk.

It’s ok if you Leave a bit of an edge, you won’t notice it!

Step 6:
Turn your project right side out, Open the opening part that you didn’t completely sew shut.

Pull one side of the ear through the hole with your finger, then the other side.

Step 7:
You can now sew up the hole if you wish, but we didn’t notice it and kept it as is. You can also keep it open incase you decide to add some wire to the inside to help form the bunny ears.
Step 9:
Iron your bunny ears, they are very wrinkled! Turning them inside out made them wrinkly. I didn’t take any photos of this step, but if you want to get any wrinkles out now is the time to iron those cute bunny ears!

Step 10:
Put twigs on the metal wreath frame: Get your metal wreath frame and pussy willow branches (or any other vines or branches) and start wrapping them around the metal frame. You can use a string and tie some of the twigs on as you get started, then randomly wrap each twig around the metal frame or through the other twigs until you feel like it’s enough.
This is a random twig wreath and it’s up to you as to how many twigs you want to wrap around the frame. It doesn’t have to be perfectly on the frame because the bunny ears will help hold it all into place once you tie them on!

Step 11:
Wrap the bunny ears onto the wreath. You can tie them normally with just a regular overhand knot or do these steps for this kind of knot that wraps around the wreath and pull the ends through the middle.

knotting the bunny ears onto the wreath:
fold the ears in half.
put the middle folded half over the upper part of the wreath.
wrap the end under the bottom.
put the end pieces through the hole of the middle fabric and pull up.
keeping pulling the ends up to tighten it.


Put the ears wherever you’d like! You can make one, or four like us or more!

We used pink mermaid fabric for the inner ear. Play with colours and chose patterns that suit your mood or interests. Our girls love mermaids so this was picked out for them!

How adorable are these little bunny ears once they are all placed onto the wreath?

We hope you have fun making this original Acorns and Aprons Bunny wreath. Feel free to tag us on Instagram @acorns.and.aprons if you create this craft and we may feature it as a story.
Happy Spring and Easter Crafting!

Comments