

- Dec 7, 2021
- 3 min read
Updated: Dec 5, 2022
Going on forest walks and collecting naturally fallen resources found on the forest floor is a great activity to do with children. Collecting pinecones for this craft will be just as fun as making it. You’ll also be adding a touch of nature to your home if you decide to hang your creation on your wall. We love adding natural materials to a craft to create unique nature inspired artwork. The structure of the pinecone is already super pretty and fascinatingly intricate, which will make your creation just as interesting.
This isn't an original idea, lots of owl pinecone crafts and other animals can be found online or in crafting books. However, it's such a fun craft, we had to blog about it.

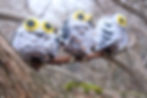
You can make one owl, or two, or an entire family! Get creative and make how many you’d like in whatever colour you’d like. We made one that resembles a snowy owl. We think that it also looks very similar to the local Northern Pygmy Owl.
Materials:
Pinecone (medium sized & small for the baby owl)
A branch
Hemp cord or string for the talons
Felt for the eyes, beak and wings - yellow, black and white
White yarn
Glue - Mod Podge or white school glue
Scissors

Steps to make a pinecone yarn owl:
Use 3 dry pinecones - gather them from your backyard or on a forest walk. Dry pinecones work best because the pine cone will be open, allow space to add the yarn.
Wrap a pinecone with white yarn until it reaches the edges of the cone scales, allow them to still be seen.
Tie a knot on the yarn so it is secure.
Cut out 6 felt shapes. One white felt heart for the face, two yellow felt circles the size of a nickel or quarter, two black felt dime sized pupils and one small triangle for the nose.
Fine the best spot for the head and glue on the white heart near the top of the pinecone. Make sure the point at the bottom of the heart lines up with a pinecone scale so that it can become the beak.
Glue on the felt yellow circle eyes onto the white head.
Glue the black felt circles onto the middle of the yellow felt circles.
Wing: Cut out two half circle wings with white felt and then a few black felt V shapes to glue into the white to add feather details.
Glue the wings onto both sides of pinecone, just behind the eyes.
Your owl is almost done but now it needs to be attached to the branch (only if you want it to be)!
Wrap a piece of hemp cord around the branch three time and tie a knot, make the knot facing upward on the branch. You’ll hide the knot by glueing the owl over top of it At the last step. Do this step again for the other talon.
Glue on the pinecone with thick white glue or Mod Podge and allow it to dry, you may need to put something like a jar on both sides of the owl until it dries.
If you’d like to make a few owls, do the same instructions above for the other owls.


You can also make these pinecone owls into tree ornaments!
Attach a string to the top instead of adding the branch to the bottom:

You can add acorn tops for the eyes or anything else

you think of to make it unique.

We hope you have fun collecting pinecones and creating this cute pinecone craft. It looks adorable on a kid‘s bedroom wall. Feel free to tag us on Instagram @acorns.and.aprons if you create this fun owl craft, we would love to see your beautiful creations!