- acornsandaprons

- Jan 22, 2021
- 3 min read
Updated: Jan 22, 2021

These Suncatcher Moon Phases are a playful way to add colour to your window. It’s the perfect craft for any young astronomer wanting to know more about our night sky. With the colourful twist of combining rainbows and moon phases together to create rainbow suncatcher moon phases. Create these colourful and educational moon phases to help practice naming the phases of the moon and to practice colour recognition.
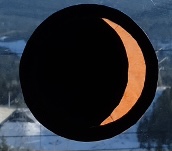
The coloured tissue paper represents the bright part of the moon (moonlight). The black card stock represents the dark side of the moon and is also a border that holds on the coloured tissue paper.
The moon is a fascinating subject, it is consistent and constant. It rotates around the Earth roughly every 29 days.

The “moonlight” that we see coming off of the moon and changing as it moves slowly around the earth is actually the sun reflecting off of the moon’s surface. The sun doesn’t move (relative to earth), but as the moon moves around the earth the sunlight changes the way it reflects because only the part that the sun is hitting gets lit up. The rest is the dark side of the moon that is the furthest away from the sun and therefore it’s in shadow.
The Moon looks slightly different each night. We describe this by naming how the Moon looks with the eight Moon phases:
🌑 New Moon 🌒 Waxing Crescent 🌓 First Quarter 🌔 Waxing Gibbous 🌕 Full Moon 🌖 Waning Gibbous 🌗 Third Quarter 🌘 Waning Crescent


Now that you learned a bit about the inspiration behind this moon phase craft, let’s get to creating it!

Materials:
Black thick paper, like card stock
White pencil crayon
Two different sizes of circles to trace, lids of jars work great!
Scissors (or exacto knife)
Glue
Coloured tissue paper - all the colours of the rainbow
Masking tape to tape the completed moon phases onto the window, or tie them up with a string
Directions:
Trace 8 circles onto black card stock (the larger circle out of the two sizes that you need to trace) and cut out all of the 8 black circles, any size will do. We traced a mason jar lid and then used the inner circular lid for the second circle size.

Trace another smaller circle within the cut circle, creating roughly a half inch border around the entire circle. You could also freehand the circles, if you have a good eye. Then draw each moon phase and shade the part you need to cut out. Leaving the dark side of the moon there and only cut out where the light side of the moon in each moon phase is. Scroll down and use our moon phases in the slider as a reference, if you aren’t sure how they are supposed to look.

Cut out each dark side of the moon that you drew out, making sure to leave the border intact. You can cut it out with scissors, or an adult can use an exacto knife to get precise lines..

Once all of the pieces are cut out, like shown below, you can discard the cut pieces that you don’t need.

Now it is Time to GLUE:
We used Mod podge and a paint brush, but school glue or glue sticks will work too.
Place the fully black part of the moon phase cutout face Up, that is the side you’ll be glueing on. The white pencil crayon side will be the side on top of the paper tissue ,
Place glue fully along the cutout opening (like the picture below).

Now place the tissue paper (use the colour of your choice -or follow the further colour directions below) onto the glue, pressing it down. Make sure it’s nice and flat. Allow the glue to dry. Do this for all 8 pieces of the moon phases cutouts.


When you place the tissue paper on the black cut out, it should look Like the above picture. When it dries you can cut the excess piece of tissue paper off. It will then look like the below picture.


Move them around and make any window in your house a piece of art!

Names of the Moon Phases with the colours we used:

We did each moon phase a colour of the rainbow, and one pink and one black.

We hope you have fun creating this colourful moon phases suncatcher craft. It comes together really easily and the end result is truly breathtaking. Feel free to tag us on Instagram @acorns.and.aprons, if you create this rainbow suncatcher moon phases craft. We would love to see your creations and we’ll feature it as our story.


Comments