

- May 15, 2021
- 6 min read

Making homemade paper is a fun and easy craft activity, especially when you add fresh flower petals and flowers for a touch of natural beauty. Although the process is simple, it's not ideal for producing large quantities of paper, especially with kids involved. Typically, this recipe yields around six thick pieces of paper, which we love to turn into journal covers or art pieces to adorn our walls.
For a less messy and more enjoyable experience, we recommend making your paper outside, making it an ideal spring, summer, or fall activity. Our two-year-old enjoys playing with the paper pulp, making it a perfect sensory activity in addition to a creative craft.

Opting for recycled paper is an excellent way to reduce waste and reuse resources. It's also a great activity for kids to participate in, as they can witness the transformation of recycled paper into pulp and then repurposed into new paper. To make it even more exciting, you can add unique designs to the paper. In this craft, we chose to incorporate rain clouds, but we have also created earth and rainbow paper designs recently, which you can find at the bottom of this page.

Collecting flowers in nature or in your backyard is part of the fun in making this craft.
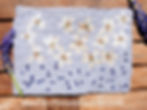
Our six year old daughter came up with this paper design, after we learned about clouds. You may want to check out our other cloud blog posting!
Imagination is crucial to this craft! You are creating clouds out of flowers, so it’s representing a familiar object in an unfamiliar way. You must rely a bit on your imagination to Interpret your design.
Kids can come up with some interesting concepts if you give them the right materials and let them explore. When we collected the hyacinth flower and broke the tiny flowers off, the concept organically formed, they looked like rain drops when placed under the white flowers!
Dandelion seeds would be a fun one to use. They weren’t ready yet, so we’ll use them next time. See what you find in nature and your backyard and you may come up with some really interesting rain cloud paper!

Materials:
Paper making kit, or a paper making frame with two separate mesh pieces.
a roller or sponge or block to press the water out.
A blender
Recycled paper - blue or white and white paper
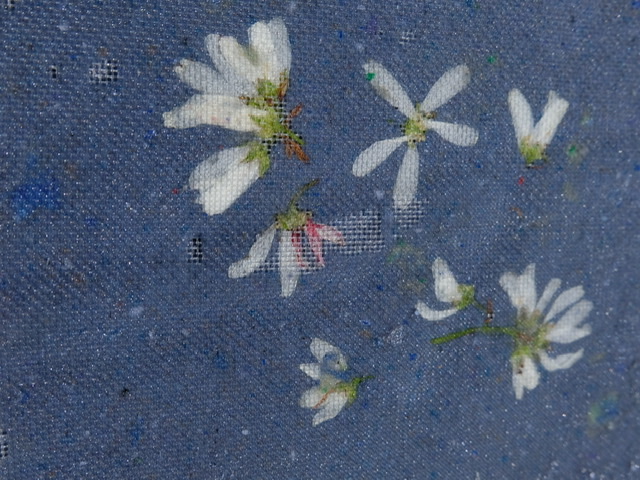
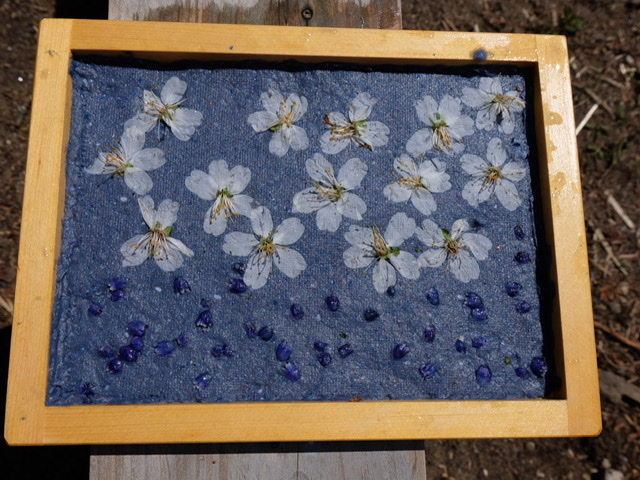
White flowers or flower petals - we used fruit blossoms
Blue flowers - we used purple grape hyacinth
Towels
A press of some kind like a heavy piece of wood or a book to press the paper

Steps:
1. If you haven’t gathered the flowers from outside already, go outside and grab some to use in the pulp and directly onto the paper.
you can make the paper fully out of flowers or just from recycled paper or by combining both. We mostly used recycled paper with some white flower pedals.

purple grape hyacinth:

Wild cherry Blossoms:

2. Rip your recycled paper. For the cloud paper, try to use blue paper or mix blue with white. You can use old boxes with blue colour or newspaper or scraps of construction paper.
We save our used crafting paper to make homemade paper with, you won’t need much. Rip about a cup or cup and a half of paper into small pieces.

3. Blend your paper with two cups of water on high, until it is a pulp, if it seems too thick, add more water. I often fill the blender 3/4 up with water. Here’s a picture of it blending, it looks fuller than it is,

Bring the materials outside to make the paper outside! You will have way less mess and can squeeze out the water directly onto dirt or onto your yard!
This is what it will look like all blended:

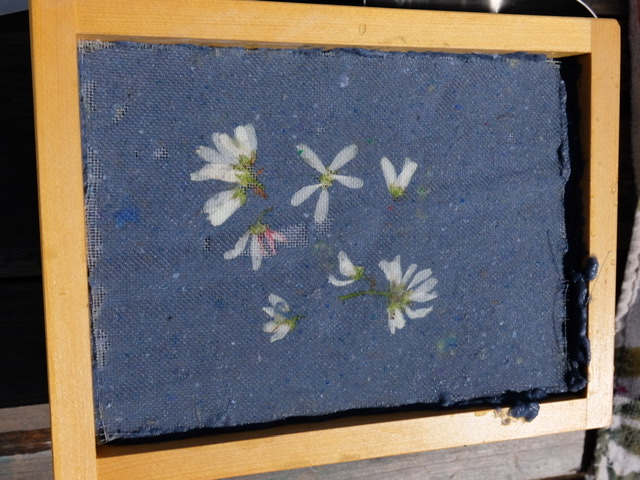
4. Pour your pulp into your paper making frame. Make sure you evenly coat the frame. Make it as thick or thin as you’d like. We are making our paper a bit thick because they will be turned into journal covers later.

You can place a removable mesh frame into the paper-making frame, that way you can remove the paper easily and you’ll have the mesh on top of the paper once you turn it over. This is optional, it will release from the frame either way.
Since we made our paper outside we aren’t too concerned with runoff water. Place a tray under your frame to keep water from getting everywhere, if desired!


5. while the pulp is still wet in the frame it is time to add your flowers!
Make any design you’d like for the clouds. Use white flower petals or the entire flowers. Be careful not to overlap the flowers or they might not stick to the paper, dry as well, or could turn brown before they dry. Some flowers keep their colour better while drying, experiment to see which works best, or use pre-dried flowers if you are concerned.

Place the blue flowers to resemble rain and white flowers to look like clouds. Try to avoid the greenery if it’s still attached to the flower, it may not stick or dry well.
These were made by the kids so I wasn’t as concerned and just wanted them to have fun. Place the blue flowers to resemble rain.


6. Now it is time to press it down. Place a mesh screen over the entire paper pulp. Press it down with something flat like a sponge, or even a foam or wooden block or a rolling pin (or cylinder block or other handy tool). Even just your hands work to press it down if need be.


7. Carefully Remove the paper from the frame:
Take off the mesh layer on top and turn your paper upside down onto a towel.

Lift the frame up and voila your paper is now on the towel.

8. Keep the bottom mesh on your paper (if you had one inserted) or place a mesh screen on top of your paper before you press it with your tool, a sponge or towel. You are trying to get any extra water out.

ONLY pat down your paper while the mesh is still on it! Otherwise you will wreck your paper.

9. Take the mesh off and layer each paper as you create them into one pile,
Your pile will have one piece of paper then a towel or cheese cloth between each piece of paper. Then place a book or piece of flat wood over it for a day or two.

10. Your paper won’t fully be dry the next day, keep pressing and rotating until they dry.
tip: To dry it faster and avoid any mold I often spread them all out on a towel after they have been pressed for a day. Air dry it like this for a few hours, putting it directly in the sun and sun drying works well, just not for too long. Then place them back under a weighted press. Something like a piece of wood or large heavy book works. If it’s a book make sure there’s a dry towel under the book so you don’t damage you book. Leave it for another day or two to flatten further.
Some flowers hold their colours better than others. You don’t need to press dry it for it to hold its colour, drying it will do that. We press it so that the paper is flat. Experiment with what flowers hold their colours best. White is often tricky and turns brown, so follow the tips of laying it flat and not overcrowding it.

Get creative with different concepts of paper or freestyle and randomly add flowers and flower pedals.


Other kinds of flower paper:
We recently made some rainbow nature paper out of flowers to go with our rain cloud paper.

This paper turned out super vibrant and most of the colours stayed true. We followed these same steps. We pressed it for days but allowed it to air dry for a bit in between pressing it.

For the larger paper with the flower colour wheel, we used our colour wheel printable as a reference at the bottom of the paper-making frame. It is a free printable you can download under the printable section in the main menu.
You can put the reference printable right under the frame so it doesn’t become the new paper and then do each section one at a time.

Another option is to cut out the circle colour wheel and put it right in the frame, then place your paper pulp and flowers on top of it and press it altogether.

Collecting the items in nature is part of the fun! We only pick the flowers that we find in abundance. There’s nothing worse than picking a flower that needs to help support the bees and butterflies! We have so many fruit trees and lilacs growing right now that it was easy to grab a few and not feel like you are taking any away.


You may want to make earth paper!


Another blog posting coming about our earth paper making!

We hope you enjoy creating this homemade representative flower rain cloud paper. Feel free to tag us on Instagram @acorns.and.aprons if you create it. We may feature your beautiful creations!
