

- Nov 9, 2020
- 3 min read
This watercolour craft is super fun for all ages, the colours are vibrant and it’s easy for even beginners to paint because the edges are raised by using glue. The raised edges helps the child stay in the lines and shows them specific areas to apply the paint. It’s a bit like painting by numbers. Children will explore patterns, shapes and colours. This is a fun introduction to watercolour painting because all ages can create this painting and have it look great.
Materials:
1. white watercolour paper
2. watercolour paint - washable watercolour paint for small children and regular watercolour paint for older kids. 3. school glue
-any non-toxic child safe glue.
-your preference of white or clear, we used clear glue.
-must be in a squeezable bottle.
4. small and medium sized paintbrushes
5. a container of water
- to use with the watercolour paint and to clean the brushes.

DAY ONE:
Have fun creating multiple images of poppy outlines using white or clear children’s non-toxic glue. We always make more than we could possibly paint, just to pick and choose our favourites once it’s dry. Some will turn out better than others. For this step you’ll need your watercolour paper and glue.
STEPS:
Use regular sized watercolour paper or cut out a bunch of square pieces of watercolour paper to the size you like, either 4 inches by 4 inches or larger.
Apply the glue by squeezing it directly out of the bottle into a circle pattern onto the paper, about an inch from the paper’s edges.
Create smaller circles inside the first circle in a clockwise or counterclockwise motion, exactly where every 2nd or 3rd number is on a clock.
Add one more final small circle in the middle of the first circle for the green paint.
Set the glue outline aside in a safe dry place to fully dry. Most glue will dry within an hour or two but to be on the safe side allow it to fully set, waiting 24 hours.
You should have a bunch of Glue Poppy outlines like this:


Here are the picture steps for the glue outline, feel free to add the circles as close together or as far away as you’d like. The perfect thing about this craft is that there is no wrong way to make the outline, as long as you stay inside the first bigger circle. You can randomly create circles or use this pattern;


DAY TWO:
Now that you have created your amazing poppy outlines, it’s time to add the colour.
This is where the magic happens and the picture starts looking like a poppy. For this step you’ll need your glue outlines that you made prior that are now dry and watercolour paints and a paintbrush. You’ll also need a container with water in it - to clean the brushes after each colour is applied and to add water to the watercolour paints.
STEPS:
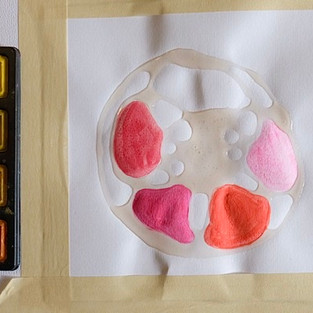
Paint the outer shapes various shades of red, orange and pink. - you’ll need to mix water with the paints by applying water with your brush. Clean your brush with the water after each colour.
Paint the inner shapes green or purple for the middle pistil (seed pod) of the poppy.
You can also add a few black pedal markings on a few of the shapes.
Here is an example of the steps:


A Poppy Painting by a two year old:

Poppy Watercolour Painting, Charlotte age 6.


#poppypainting #homeschool #remembrancecraft #poppycraft #kidcraft #watercolour #watercolourkid #watercolourpainting


Comments